Toggle navigation
Home
安装部署
Archives
Tags
Untitled
2019-05-06 06:51:53
219
0
0
louyj
#PREFLIGHT CHECKLIST The ceph-deploy tool operates out of a directory on an admin node. Any host with network connectivity and a modern python environment and ssh (such as Linux) should work. ##CEPH-DEPLOY SETUP register the target machine with subscription-manager, verify your subscriptions, and enable the “Extras” repository for package dependencies. For example: yum install subscription-manager -y sudo subscription-manager repos --enable=rhel-7-server-extras-rpms Install and enable the Extra Packages for Enterprise Linux (EPEL) repository: sudo yum install -y https://dl.fedoraproject.org/pub/epel/epel-release-latest-7.noarch.rpm Add the Ceph repository to your yum configuration file at /etc/yum.repos.d/ceph.repo with the following command. Replace {ceph-stable-release} with a stable Ceph release (e.g., luminous.) For example: cat << EOM > /etc/yum.repos.d/ceph.repo [ceph-noarch] name=Ceph noarch packages baseurl=https://download.ceph.com/rpm-nautilus/el7/noarch enabled=1 priority=10 gpgcheck=1 type=rpm-md gpgkey=https://download.ceph.com/keys/release.asc EOM Update your repository and install ceph-deploy: sudo yum update sudo yum install ceph-deploy ##CEPH NODE SETUP ###INSTALL NTP We recommend installing NTP on Ceph nodes (especially on Ceph Monitor nodes) to prevent issues arising from clock drift. See Clock for details. sudo yum install ntp ntpdate ntp-doc ###CREATE A CEPH DEPLOY USER The ceph-deploy utility must login to a Ceph node as a user that has passwordless sudo privileges, because it needs to install software and configuration files without prompting for passwords. Recent versions of ceph-deploy support a --username option so you can specify any user that has password-less sudo (including root, although this is NOT recommended). To use ceph-deploy --username {username}, the user you specify must have password-less SSH access to the Ceph node, as ceph-deploy will not prompt you for a password. We recommend creating a specific user for ceph-deploy on ALL Ceph nodes in the cluster. Please do NOT use “ceph” as the user name. A uniform user name across the cluster may improve ease of use (not required), but you should avoid obvious user names, because hackers typically use them with brute force hacks (e.g., root, admin, {productname}). The following procedure, substituting {username} for the user name you define, describes how to create a user with passwordless sudo. Create a new user on each Ceph Node ssh user@ceph-server sudo useradd -d /home/{username} -m {username} sudo passwd {username} For the new user you added to each Ceph node, ensure that the user has sudo privileges. echo "{username} ALL = (root) NOPASSWD:ALL" | sudo tee /etc/sudoers.d/{username} sudo chmod 0440 /etc/sudoers.d/{username} ###ENABLE PASSWORD-LESS SSH Generate the SSH keys, but do not use sudo or the root user. Leave the passphrase empty: ssh-keygen Copy the key to each Ceph Node, replacing {username} with the user name you created with Create a Ceph Deploy User. ssh-copy-id {username}@node1 ssh-copy-id {username}@node2 ssh-copy-id {username}@node3 Modify the ~/.ssh/config file of your ceph-deploy admin node so that ceph-deploy can log in to Ceph nodes as the user you created without requiring you to specify --username {username} each time you execute ceph-deploy. This has the added benefit of streamlining ssh and scp usage. Replace {username} with the user name you created: Host node1 Hostname node1 User {username} Host node2 Hostname node2 User {username} Host node3 Hostname node3 User {username} ###ENSURE CONNECTIVITY Ensure connectivity using ping with short hostnames (hostname -s). Address hostname resolution issues as necessary. ###OPEN REQUIRED PORTS Ceph Monitors communicate using port 6789 by default. Ceph OSDs communicate in a port range of 6800:7300 by default. For example, on monitors: sudo firewall-cmd --zone=public --add-service=ceph-mon --permanent and on OSDs and MDSs: sudo firewall-cmd --zone=public --add-service=ceph --permanent Once you have finished configuring firewalld with the --permanent flag, you can make the changes live immediately without rebooting: sudo firewall-cmd --reload ###SELINUX sudo setenforce 0 ###PRIORITIES/PREFERENCES Ensure that your package manager has priority/preferences packages installed and enabled. On CentOS, you may need to install EPEL. On RHEL, you may need to enable optional repositories. sudo yum install yum-plugin-priorities For example, on RHEL 7 server, execute the following to install yum-plugin-priorities and enable the rhel-7-server-optional-rpms repository: sudo yum install yum-plugin-priorities --enablerepo=rhel-7-server-optional-rpms #STORAGE CLUSTER QUICK START As a first exercise, create a Ceph Storage Cluster with one Ceph Monitor and three Ceph OSD Daemons. Once the cluster reaches a active + clean state, expand it by adding a fourth Ceph OSD Daemon, a Metadata Server and two more Ceph Monitors. For best results, create a directory on your admin node for maintaining the configuration files and keys that ceph-deploy generates for your cluster. mkdir my-cluster cd my-cluster ##STARTING OVER If at any point you run into trouble and you want to start over, execute the following to purge the Ceph packages, and erase all its data and configuration: ceph-deploy purge {ceph-node} [{ceph-node}] ceph-deploy purgedata {ceph-node} [{ceph-node}] ceph-deploy forgetkeys rm ceph.* lvdisplay lvremove --force /dev/ceph-xxx vgdisplay vgremove --force ceph-xxx ##CREATE A CLUSTER On your admin node from the directory you created for holding your configuration details, perform the following steps using ceph-deploy. Create the cluster. ceph-deploy new {initial-monitor-node(s)} Specify node(s) as hostname, fqdn or hostname:fqdn. For example: ceph-deploy new node1 Check the output of ceph-deploy with ls and cat in the current directory. You should see a Ceph configuration file (ceph.conf), a monitor secret keyring (ceph.mon.keyring), and a log file for the new cluster. See ceph-deploy new -h for additional details. Install Ceph packages. ceph-deploy install {ceph-node} [...] For example: ceph-deploy install node1 node2 node3 Deploy the initial monitor(s) and gather the keys: ceph-deploy mon create-initial Once you complete the process, your local directory should have the following keyrings: ceph.client.admin.keyring ceph.bootstrap-mgr.keyring ceph.bootstrap-osd.keyring ceph.bootstrap-mds.keyring ceph.bootstrap-rgw.keyring ceph.bootstrap-rbd.keyring ceph.bootstrap-rbd-mirror.keyring Use ceph-deploy to copy the configuration file and admin key to your admin node and your Ceph Nodes so that you can use the ceph CLI without having to specify the monitor address and ceph.client.admin.keyring each time you execute a command. ceph-deploy admin {ceph-node(s)} For example: ceph-deploy admin node1 node2 node3 Deploy a manager daemon ceph-deploy mgr create node1 Add three OSDs. For the purposes of these instructions, we assume you have an unused disk in each node called /dev/vdb. **Be sure that the device is not currently in use and does not contain any important data.** ceph-deploy osd create --data {device} {ceph-node} For example: ceph-deploy osd create --data /dev/vdb node1 ceph-deploy osd create --data /dev/vdb node2 ceph-deploy osd create --data /dev/vdb node3 Check your cluster’s health. ssh node1 sudo ceph health Your cluster should report HEALTH_OK. You can view a more complete cluster status with: ssh node1 sudo ceph -s ##EXPANDING YOUR CLUSTER Once you have a basic cluster up and running, the next step is to expand cluster. Add a Ceph Metadata Server to node1. Then add a Ceph Monitor and Ceph Manager to node2 and node3 to improve reliability and availability. ###ADD A METADATA SERVER **To use CephFS, you need at least one metadata server.** Execute the following to create a metadata server: ceph-deploy mds create {ceph-node} For example: ceph-deploy mds create node1 ###ADDING MONITORS **A Ceph Storage Cluster requires at least one Ceph Monitor and Ceph Manager to run.** For high availability, Ceph Storage Clusters typically run multiple Ceph Monitors so that the failure of a single Ceph Monitor will not bring down the Ceph Storage Cluster. Ceph uses the Paxos algorithm, which requires a majority of monitors (i.e., greater than N/2 where N is the number of monitors) to form a quorum. Odd numbers of monitors tend to be better, although this is not required. Add two Ceph Monitors to your cluster: ceph-deploy mon add {ceph-nodes} For example: ceph-deploy mon add node2 node3 Once you have added your new Ceph Monitors, Ceph will begin synchronizing the monitors and form a quorum. You can check the quorum status by executing the following: ceph quorum_status --format json-pretty ###ADDING MANAGERS The Ceph Manager daemons operate in an active/standby pattern. Deploying additional manager daemons ensures that if one daemon or host fails, another one can take over without interrupting service. To deploy additional manager daemons: ceph-deploy mgr create node2 node3 You should see the standby managers in the output from: ssh node1 sudo ceph -s ###ADD AN RGW INSTANCE To use the Ceph Object Gateway component of Ceph, you must deploy an instance of RGW. Execute the following to create an new instance of RGW: ceph-deploy rgw create {gateway-node} For example: ceph-deploy rgw create node1 By default, the RGW instance will listen on port 7480. This can be changed by editing ceph.conf on the node running the RGW as follows: [client] rgw frontends = civetweb port=80 To use an IPv6 address, use: [client] rgw frontends = civetweb port=[::]:80 ###STORING/RETRIEVING OBJECT DATA To store object data in the Ceph Storage Cluster, a Ceph client must: - Set an object name - Specify a pool The Ceph Client retrieves the latest cluster map and the CRUSH algorithm calculates how to map the object to a placement group, and then calculates how to assign the placement group to a Ceph OSD Daemon dynamically. To find the object location, all you need is the object name and the pool name. For example: ceph osd map {poolname} {object-name} http://docs.ceph.com/docs/master/start/quick-ceph-deploy/#storing-retrieving-object-data #BLOCK DEVICE To use this guide, you must have executed the procedures in the Storage Cluster Quick Start guide first. Ensure your Ceph Storage Cluster is in an active + clean state before working with the Ceph Block Device. ##CREATE A BLOCK DEVICE POOL On the admin node, use the ceph tool to create a pool (we recommend the name ‘rbd’). osd pool default pg num = 100 osd pool default pgp num = 100 To create a pool, execute: ceph osd pool create {pool-name} {pg-num} [{pgp-num}] [replicated] \ [crush-rule-name] [expected-num-objects] ceph osd pool create {pool-name} {pg-num} {pgp-num} erasure \ [erasure-code-profile] [crush-rule-name] [expected_num_objects] for examples: ceph osd pool create pool01 100 On the admin node, use the rbd tool to initialize the pool for use by RBD: rbd pool init <pool-name> ###ASSOCIATE POOL TO APPLICATION Pools need to be associated with an application before use. Pools that will be used with CephFS or pools that are automatically created by RGW are automatically associated. Pools that are intended for use with RBD should be initialized using the rbd tool (see Block Device Commands for more information). For other cases, you can manually associate a free-form application name to a pool.: ceph osd pool application enable {pool-name} {application-name} ###SET POOL QUOTAS You can set pool quotas for the maximum number of bytes and/or the maximum number of objects per pool. ceph osd pool set-quota {pool-name} [max_objects {obj-count}] [max_bytes {bytes}] For example: ceph osd pool set-quota data max_objects 10000 To remove a quota, set its value to 0. ###DELETE A POOL To delete a pool, execute: ceph osd pool delete {pool-name} [{pool-name} --yes-i-really-really-mean-it] To remove a pool the mon_allow_pool_delete flag must be set to true in the Monitor’s configuration. Otherwise they will refuse to remove a pool. ###RENAME A POOL To rename a pool, execute: ceph osd pool rename {current-pool-name} {new-pool-name} ###SHOW POOL STATISTICS To show a pool’s utilization statistics, execute: rados df Additionally, to obtain I/O information for a specific pool or all, execute: ceph osd pool stats [{pool-name}] ###SET THE NUMBER OF OBJECT REPLICAS To set the number of object replicas on a replicated pool, execute the following: ceph osd pool set {poolname} size {num-replicas} For example: ceph osd pool set data size 3 You may execute this command for each pool. Note: An object might accept I/Os in degraded mode with fewer than pool size replicas. To set a minimum number of required replicas for I/O, you should use the min_size setting. For example: ceph osd pool set data min_size 2 This ensures that no object in the data pool will receive I/O with fewer than min_size replicas. ###GET THE NUMBER OF OBJECT REPLICAS To get the number of object replicas, execute the following: ceph osd dump | grep 'replicated size' ##CONFIGURE A BLOCK DEVICE On the ceph-client node, create a block device image. rbd create foo --size 4096 --image-feature layering [-m {mon-IP}] [-k /path/to/ceph.client.admin.keyring] [-p {pool-name}] for examples: rbd create image01 --size 4096 --image-feature layering -p pool01 On the ceph-client node, map the image to a block device. sudo rbd map foo --name client.admin [-m {mon-IP}] [-k /path/to/ceph.client.admin.keyring] [-p {pool-name}] for examples: sudo rbd map image01 --name client.admin -p pool01 Use the block device by creating a file system on the ceph-client node. sudo mkfs.ext4 -m0 /dev/rbd/{pool-name}/foo for example: sudo mkfs.ext4 -m0 /dev/rbd/pool01/image01 Mount the file system on the ceph-client node. sudo mkdir /mnt/ceph-block-device sudo mount /dev/rbd/{pool-name}/foo /mnt/ceph-block-device cd /mnt/ceph-block-device Optionally configure the block device to be automatically mapped and mounted at boot(and unmounted/unmapped at shutdown) see http://docs.ceph.com/docs/master/man/8/rbdmap/ #FILESYSTEM ##PREREQUISITES On the admin node, use ceph-deploy to install Ceph on your ceph-client node. ceph-deploy install ceph-client ##CREATE A FILESYSTEM ``` ceph osd pool create cephfs_data <pg_num> ceph osd pool create cephfs_metadata <pg_num> ceph fs new <fs_name> cephfs_metadata cephfs_data ``` ##MOUNT FILESYSTEM ###Mount CephFS with the Kernel Driver ####CREATE A SECRET FILE The Ceph Storage Cluster runs with authentication turned on by default. You should have a file containing the secret key (i.e., not the keyring itself). To obtain the secret key for a particular user, perform the following procedure: Identify a key for a user within a keyring file. For example: cat ceph.client.admin.keyring Copy the key of the user who will be using the mounted CephFS filesystem. It should look something like this: [client.admin] key = AQCj2YpRiAe6CxAA7/ETt7Hcl9IyxyYciVs47w== Open a text editor. Paste the key into an empty file. It should look something like this: AQCj2YpRiAe6CxAA7/ETt7Hcl9IyxyYciVs47w== Save the file with the user name as an attribute (e.g., admin.secret). Ensure the file permissions are appropriate for the user, but not visible to other users. ####KERNEL DRIVER ``` sudo mkdir /mnt/mycephfs sudo mount -t ceph {ip-address-of-monitor}:6789:/ /mnt/mycephfs ``` The Ceph Storage Cluster uses authentication by default. Specify a user name and the secretfile you created in the Create a Secret File section. For example: sudo mount -t ceph 192.168.0.1:6789:/ /mnt/mycephfs -o name=admin,secretfile=admin.secret mount -t ceph <monitor1-host-name>:6789,<monitor2-host-name>:6789,<monitor3-host-name>:6789:/ <mount-point> -o name=admin,secretfile=admin.secret ####Permanently in /etc/fstab 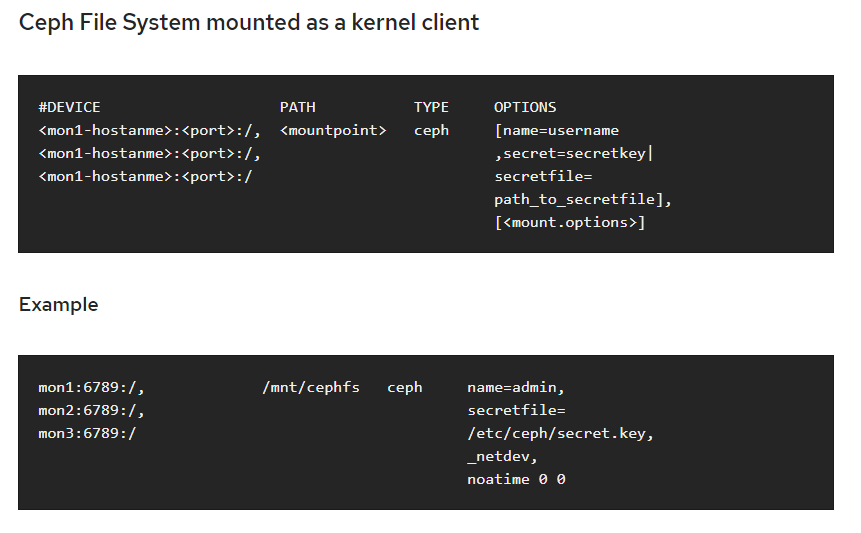 ###MOUNT CEPHFS USING FUSE Before mounting a Ceph File System in User Space (FUSE), ensure that the client host has a copy of the Ceph configuration file and a keyring with CAPS for the Ceph metadata server. From your client host, copy the Ceph configuration file from the monitor host to the `/etc/ceph directory.` ``` sudo mkdir -p /etc/ceph sudo scp {user}@{server-machine}:/etc/ceph/ceph.conf /etc/ceph/ceph.conf ``` From your client host, copy the Ceph keyring from the monitor host to to the /etc/ceph directory. sudo scp {user}@{server-machine}:/etc/ceph/ceph.keyring /etc/ceph/ceph.keyring Ensure that the Ceph configuration file and the keyring have appropriate permissions set on your client machine To mount the Ceph file system as a FUSE, you may use the ceph-fuse command. For example: ``` mkdir ceph-fuse cp /etc/ceph/ceph.conf ceph-fuse cp /etc/ceph/ceph.client.admin.keyring ceph-fuse cp build/bin/ceph-fuse ceph-fuse cp -r build/lib ceph-fuse mv ceph-fuse /opt export LD_LIBRARY_PATH=$LD_LIBRARY_PATH:/opt/ceph-fuse/lib/ sudo mkdir /mnt/cephfs sudo ceph-fuse -m app-server-kubernetes-01:6789,app-server-kubernetes-02:6789,app-server-kubernetes-03:6789 /mnt/cephfs or sudo ceph-fuse /mnt/cephfs ``` **If you have more than one file system, specify which one to mount using the --client_mds_namespace command line argument, or add a client_mds_namespace setting to your ceph.conf.** To automate mounting ceph-fuse, you may add an entry to the system fstab To mount CephFS in your file systems table as a file system in user space, add the following to /etc/fstab: ``` #DEVICE PATH TYPE OPTIONS none /mnt/cephfs fuse.ceph ceph.id={user-ID}[,ceph.conf={path/to/conf.conf}],_netdev,defaults 0 0 ``` For example: ``` none /mnt/cephfs fuse.ceph _netdev,defaults 0 0 none /mnt/ceph fuse.ceph ceph.id=myuser,ceph.conf=/etc/ceph/foo.conf,_netdev,defaults 0 0 ``` #CEPH DASHBOARD ##ENABLING Within a running Ceph cluster, the Ceph Dashboard is enabled with: ceph mgr module enable dashboard ##CONFIGURATION SSL can also be disabled by setting this configuration value: ceph config set mgr mgr/dashboard/ssl false ###HOST NAME AND PORT These defaults can be changed via the configuration key facility on a cluster-wide level (so they apply to all manager instances) as follows: ceph config set mgr mgr/dashboard/server_addr $IP ceph config set mgr mgr/dashboard/server_port $PORT ###USERNAME AND PASSWORD In order to be able to log in, you need to create a user account and associate it with at least one role. We provide a set of predefined system roles that you can use. For more details please refer to the User and Role Management section. To create a user with the administrator role you can use the following commands: ceph dashboard set-login-credentials admin admin ###ACCESSING THE DASHBOARD http://139.162.97.24:8080/ #Configuration [global] fsid = 77b5ff70-eafa-4c7a-981e-86edac2cb1c6 mon_initial_members = app-server-kubernetes-01, app-server-kubernetes-02, app-server-kubernetes-03 mon_host = 172.17.36.232,172.17.36.233,172.17.36.234 auth_cluster_required = cephx auth_service_required = cephx auth_client_required = cephx osd pool default size = 2 #默认副本数设置 默认是3 osd pool default min size = 1 #PG 处于 degraded 状态不影响其 IO 能力,min_size是一个PG能接受IO的最小副本数 max open files = 131072 #默认0#如果设置了该选项,Ceph会设置系统的max open fds [mon] mon clock drift allowed = 1 #默认值0.05#monitor间的clock drift mon osd min down reporters = 1 #默认值1#向monitor报告down的最小OSD数 mon osd down out interval = 600 #默认值300 #标记一个OSD状态为down和out之前ceph等待的秒数 [osd] osd journal size = 20000 #默认5120 #osd journal大小 osd mkfs type = xfs #格式化系统类型 osd max write size = 512 #默认值90 #OSD一次可写入的最大值(MB) osd client message size cap = 524288000 #524288000 #客户端允许在内存中的最大数据(bytes) osd deep scrub stride = 131072 #默认值524288 #在Deep Scrub时候允许读取的字节数(bytes) osd op threads = 16 #默认值2 #并发文件系统操作数 osd disk threads = 4 #默认值1 #OSD密集型操作例如恢复和Scrubbing时的线程 osd map cache size = 500 #默认值500 #保留OSD Map的缓存(MB) osd map cache bl size = 128 #默认值50 #OSD进程在内存中的OSD Map缓存(MB) osd mount options xfs = "rw,noexec,nodev,noatime,nodiratime,nobarrier" #默认值rw,noatime,inode64 #Ceph OSD xfs Mount选项 osd recovery op priority = 10 #默认值10 #恢复操作优先级,取值1-63,值越高占用资源越高 osd recovery max active = 15 #默认值15 #同一时间内活跃的恢复请求数 osd max backfills = 10 #默认值10 #一个OSD允许的最大backfills数 osd min pg log entries = 30000 #默认值3000 #修建PGLog是保留的最大PGLog数 osd max pg log entries = 100000 #默认值10000 #修建PGLog是保留的最大PGLog数 osd mon heartbeat interval = 40 #默认值30 #OSD ping一个monitor的时间间隔(默认30s) ms dispatch throttle bytes = 1048576000 #默认值 104857600 #等待派遣的最大消息数 objecter inflight ops = 819200 #默认值1024 #客户端流控,允许的最大未发送io请求数,超过阀值会堵塞应用io,为0表示不受限 osd op log threshold = 50 #默认值5 #一次显示多少操作的log osd crush chooseleaf type = 0 #默认值为1 #CRUSH规则用到chooseleaf时的bucket的类型 filestore xattr use omap = true #默认false#为XATTRS使用object map,EXT4文件系统时使用,XFS或者btrfs也可以使用 filestore min sync interval = 10 #默认0.1#从日志到数据盘最小同步间隔(seconds) filestore max sync interval = 15 #默认5#从日志到数据盘最大同步间隔(seconds) filestore queue max ops = 25000 #默认500#数据盘最大接受的操作数 filestore queue max bytes = 1048576000 #默认100 #数据盘一次操作最大字节数(bytes filestore queue committing max ops = 50000 #默认500 #数据盘能够commit的操作数 filestore queue committing max bytes = 10485760000 #默认100 #数据盘能够commit的最大字节数(bytes) filestore split multiple = 8 #默认值2 #前一个子目录分裂成子目录中的文件的最大数量 filestore merge threshold = 40 #默认值10 #前一个子类目录中的文件合并到父类的最小数量 filestore fd cache size = 1024 #默认值128 #对象文件句柄缓存大小 filestore op threads = 32 #默认值2 #并发文件系统操作数 journal max write bytes = 1073714824 #默认值1048560 #journal一次性写入的最大字节数(bytes) journal max write entries = 10000 #默认值100 #journal一次性写入的最大记录数 journal queue max ops = 50000 #默认值50 #journal一次性最大在队列中的操作数 journal queue max bytes = 10485760000 #默认值33554432 #journal一次性最大在队列中的字节数(bytes) [client] rbd cache = true #默认值 true #RBD缓存 rbd cache size = 335544320 #默认值33554432 #RBD缓存大小(bytes) rbd cache max dirty = 134217728 #默认值25165824 #缓存为write-back时允许的最大dirty字节数(bytes),如果为0,使用write-through rbd cache max dirty age = 30 #默认值1 #在被刷新到存储盘前dirty数据存在缓存的时间(seconds) rbd cache writethrough until flush = false #默认值true #该选项是为了兼容linux-2.6.32之前的virtio驱动,避免因为不发送flush请求,数据不回写 #设置该参数后,librbd会以writethrough的方式执行io,直到收到第一个flush请求,才切换为writeback方式。 rbd cache max dirty object = 2 #默认值0 #最大的Object对象数,默认为0,表示通过rbd cache size计算得到,librbd默认以4MB为单位对磁盘Image进行逻辑切分 #每个chunk对象抽象为一个Object;librbd中以Object为单位来管理缓存,增大该值可以提升性能 rbd cache target dirty = 235544320 #默认值16777216 #开始执行回写过程的脏数据大小 ##change public network #update ceph config ceph-deploy --overwrite-conf config push localpc #update monitor map ceph mon getmap -o {filename} #view current monitor map monmaptool --print {filename} #remove current monitor from map monmaptool --rm {host1} {filename} #add new monitor to map monmaptool --add {host} {ip}:6789 --add b 10.1.0.2:6789 --add c 10.1.0.3:6789 {filename} #view current monitor map monmaptool --print {filename} #inject to monitor map ceph-mon -i {host} --inject-monmap {filename} #restart all daemon service ceph.target restart ##multi osd in one node ###GET A CRUSH MAP To get the CRUSH map for your cluster, execute the following: ceph osd getcrushmap -o {compiled-crushmap-filename} ###DECOMPILE A CRUSH MAP To decompile a CRUSH map, execute the following: crushtool -d {compiled-crushmap-filename} -o {decompiled-crushmap-filename} ###COMPILE A CRUSH MAP To compile a CRUSH map, execute the following crushtool -c {decompiled-crush-map-filename} -o {compiled-crush-map-filename} ###SET A CRUSH MAP To set the CRUSH map for your cluster, execute the following: ceph osd setcrushmap -i {compiled-crushmap-filename} ###UPDATE CEPH CONFIG update ceph.conf osd_crush_chooseleaf_type = 0 ceph-deploy --overwrite-conf config push localpc ###Restart ceph service ceph.target restart #benchmark randread IOPS benchmark fio -numjobs=1 -iodepth=128 -direct=1 -ioengine=libaio -sync=1 -rw=randread -bs=4K -size=1G -time_based -runtime=60 -name=Fio -directory=/mnt randwite IOPS benchmark fio -numjobs=1 -iodepth=128 -direct=1 -ioengine=libaio -sync=1 -rw=randwrite -bs=4K -size=1G -time_based -runtime=60 -name=Fio -directory=/mnt randread throughput benchmark fio -numjobs=1 -iodepth=128 -direct=1 -ioengine=libaio -sync=1 -rw=randread -bs=1M -size=1G -time_based -runtime=60 -name=Fio -directory=/mnt randwrite throughput benchmark fio -numjobs=1 -iodepth=128 -direct=1 -ioengine=libaio -sync=1 -rw=randwrite -bs=1M -size=1G -time_based -runtime=60 -name=Fio -directory=/mnt #Manual build ##GET SOFTWARE As Ceph development progresses, the Ceph team releases new versions of the source code. You may download source code tarballs for Ceph releases here: https://download.ceph.com/tarballs/ wget https://download.ceph.com/tarballs/ceph_13.2.5.orig.tar.gz ##BUILD CEPH To build Ceph, you need to set up a development environment, compile Ceph, and then either install in user space or build packages and install the packages. ###BUILD PREREQUISITES Before you can build Ceph source code, you need to install several libraries and tools: ./install-deps.sh ###BUILD CEPH Ceph is built using cmake. To build Ceph, navigate to your cloned Ceph repository and execute the following: ``` cd ceph ./do_cmake.sh -DCMAKE_BUILD_TYPE=RelWithDebInfo cd build make ``` By default do_cmake.sh will build a debug version of ceph that may perform up to 5 times slower with certain workloads. Pass ‘-DCMAKE_BUILD_TYPE=RelWithDebInfo’ to do_cmake.sh if you would like to build a release version of the ceph executables instead. ##INSTALL SOFTWARE
Pre:
Ceph Deployment
Next:
Esxi Installation
0
likes
219
Weibo
Wechat
Tencent Weibo
QQ Zone
RenRen
Submit
Sign in
to leave a comment.
No Leanote account?
Sign up now.
0
comments
More...
Table of content


No Leanote account? Sign up now.